


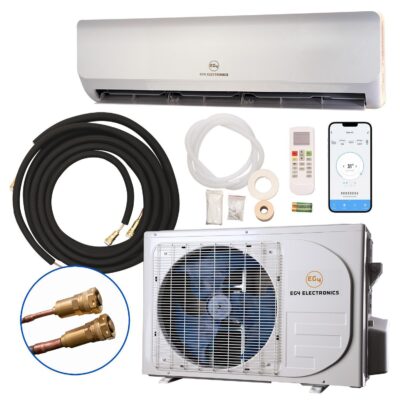
Description
- High Efficiency Diamante Ductless Mini Split Inverter Heat Pump System
- Use for both cooling and heating: 12000 BTU/hour with 20 SEER and 10 HSPF efficiency
- Diamante series carries a full line of low-ambient wall-mounted mini splits with capacities ranging from 9,000 BTU/hour to 36,000 BTU/hour for various residential and light commercial applications
- Complete system set including: indoor (fan coil) section, outdoor (condenser) section, wireless remote controller with remote holder, 16 ft. L line set with other installation accessories, free vibration absorber feet for the condensing unit
- Voltage: 115V, 60Hz, 1Ph


JMJ –
Arrived quickly. No damage at all to packaging or unit.
Find the YouTube video that is something like everything they don’t tell you. He goes thru every step including electrical and the whole thing
Really was straightforward. Hardest part is I had to get thru brick on the outside. Otherwise not bad.
I will say, if you purchase the cover set to cover up the outside lines, you need to install the backing before you connect the line sets and wiring. Ask me how I know. Otherwise you have to get creative. Also feel I had to push the lines too much on the bend to the outside for the cover kit to work correctly.
But it cools incredibly well and is whisper quiet. Highly recommend
JEFF T. –
TL;DR: This seems to be a great machine so far and I’m loving it. The machine cools extremely well. It is very quiet. No part of it is outrageously heavy. The manual is excellent. The remote is good. The thermostat is okay. The dehumidification function isn’t great. It isn’t ugly and it doesn’t detract from the room or the outside. Installation is non-trivial but DIY is certainly doable if you’re handy.
First, for the machine itself. Overall, this machine does everything I actually want and was a wonderful addition to my space.
Pros:
– Affordable
– Extremely quiet, both inside and out. The outdoor unit is so quiet it’s hard to tell if it’s on, and it produces so little vibration that I can’t feel it through the wall (mine is on a wall hanger)
– Energy efficient
– Cools spectacularly. The cold air coming out of the bottom is a whopping 28 degrees colder than the warm air going into the top (coming from a hot indoor temperature of about 80, with an outdoor temperature of about 85).
– The remote works very well and everything is clearly marked
– The “swing” function to oscillate the air output up and down or side to side works well and really helps cool the space
Cons:
– The thermostat is on the indoor unit and isn’t calibrated well to offset its position. If I set it to 68, the room temperature (different thermometers) shows 71-72. This 3-4 degree difference is always present. For whatever temperature I actually want, I set the machine to be 3-4 degrees lower than that for cooling. It is very consistent, which makes it easy to accommodate.
– The thermostat in the remote can be used instead, but it seems to be useless and it also requires line of sight. I have had this feature on other air conditioners, and it seems to never work. I think this is one of those things that looks great on paper but doesn’t work in practice and Pioneer is no exception.
– The dehumidification function doesn’t work the way I want it to because the machine runs too aggressively and does too much cooling when in “dry” mode. It is like the “dry” mode is actually “run the air conditioner on ‘low’ all the time” and so the temperature will keep falling. This is a high-energy way to achieve dehumidification.
On to installation. If you’re not thinking of doing this as a DIY job, feel free to skip the rest of the review.
Be methodical, take your time and choose to stop and get help if you’re unsure about something. This air conditioner/heat pump is an HVAC system and as such, there is a lot to it. This is not a straightforward “stick it in the window” appliance and so installation is a factor you need to consider if you’re going to buy this as a DIY item. If you have no HVAC experience (I didn’t) but are handy, you can do it. For me, install took about five or six hours, not counting electrical work to pull a new circuit, but I had some challenges with my space. In a more traditional space, it probably would have been closer to four hours.
Background:
– Do your homework. There are a bunch of YouTube videos on how to install these. They’re all a bit different. Watch several of them. None of them will be exactly right for you and your specific sub-type of machine, but they give you some great background about all of the main components, how they go together, what to expect, etc.
– Read the manual. Read it cover-to-cover. Read it before you start and keep it handy. The manual for this system is excellent and it should be your best friend during installation.
– Have the right tools. At minimum, you’ll need a hole saw (sized according to the manual), a vacuum pump, a manifold gauge (and hoses), a couple of adjustable wrenches, a drill, screwdrivers and soap bubbles. I recommend also having an open-end torque wrench and a refrigerant leak detector. I also recommend having (or be prepared to acquire) a flaring tool and a pipe cutter in case something goes wrong like it did for me. You’ll need a 1/4″ to 5/16″ adapter to connect your manifold to the service port. Some Nylog is probably a good idea. The unit comes with some sealer, but Nylog is a known quantity and I treated it as cheap insurance to be sure everything is tip-top.
– Know what accessories you’ll need (like a wiring whip, for example).
– If you’re running your own electrical for it, be sure you understand what size breaker you’ll need, what gauge of wire you should use, how to run it according to code, how to put in an electrical disconnect at the point of installation, etc. If you’re not comfortable with it, hire someone to help with that part. Electricity is no joke.
Pros:
– The manual is excellent
– There are plenty of third-party resources to help (YouTube!)
– The machinery is fairly lightweight and easy to wrangle into position
– The kit comes with every part and accessory you will need and everything is clearly labeled
– The included template for the indoor unit was very helpful
– There are some spare parts (flare nuts, seals, etc.)
Cons:
– Parts of the install are tricky. You have to move a bunch of pipe and wire through a fairly small channel, everything needs to be level or angled properly, etc. You need to be detail-oriented. This is not unique to this machine, but it’s worth calling out that some of this requires both attention and a bit of dexterity.
– It is easy to over-tighten a flare joint and snap it. My open-ended torque wrench was faulty and I went too far and sheared off a flare. This is fairly easy to fix (flare tools are simple and readily available), but be very careful during when tightening them and refer to the manual for torque (either precise or their guidelines like “arm strength”).
Installation is non-trivial but it isn’t outrageous. Take your time, be careful, make sure you’re following the manual and know what to expect before you start. Overall, this is certainly doable as a DIY exercise if you’re at least somewhat handy and not in a hurry.
Stanley S. –
Quick shipping from Jacks Small Engine, no damage to cartons. Two boxes as usual with mini splits, very well packed by Pioneer. Only minor glitch was I ordered a 240V unit and got a 110V unit. ALWAYS double check the labels, it would have been bad news to connect a 240 V supply to this unit. Easy enough to sort in the breaker panel (this is a shop building), just pulled the ganged 240 breaker, dropped in a single breaker and blanking plate, connected the now open wire to the neutral bus. Easy Peasy. I didn’t care, but suspect they would have had the unit picked up and replaced quickly. We had bad weather coming in and this was to replace a failed Mr Cool unit. Once the spring rains start around here the ground is muck for a month or two, so wanted to get the job done while the sun was shining.
Pioneer includes some interesting line set gaskets and a sealant that looks very much like Nylog Blue. The line set and flare nuts are very good, I shortened the line set by about 2 feet and the lines cut cleanly and flared very nicely using a good quality offset cone flaring tool and a film of nylog on the flaring cone as lubricant. These units take several minutes of running the outside unit before the inside fans turn on, a bit longer than the Mr Cool units I have in several other buildings. Started to get that sinking feeling on the first heating run, then the inside kicked on and all was well. Once the heat comes on, it’s nice and warm. When the next mini split needs replacement or a friend asks what to get the Pioneer unit is very nice for a quite low price.
I waited around 3 weeks before writing this and the shop building has been held at 66F the entire time, 70F when I’m working in it. The remote will probably have you scratching your head, the info IS in the manual, but it’s all pictograms for modes, the tiny little image that looks like a sun (sort of) is the heat mode. Have to give Mr Cool the point on remote clarity. Maybe I’m just set in my ways but “HEAT” is far easier to figure out the meaning of than a 6X6 pixel image of a vaguely sun like image. I’ll get used to it, no harm, no foul.