Sienna Solar > Products > 120V Solar Panels > Senville LETO Series Mini Split Air Conditioner Heat Pump, 12000 BTU 110/120V, Inverter, Works with Alexa, SEER2 20.8, 1 Ton, White
Shop
Senville LETO Series Mini Split Air Conditioner Heat Pump, 12000 BTU 110/120V, Inverter, Works with Alexa, SEER2 20.8, 1 Ton, White
ALEXA ENABLED MINI SPLIT AC/HEATING SYSTEM: Seamlessly integrate with voice control or app, allowing you to adjust your mini split air conditioner from anywhere. Set routines for optimal temperature changes, boasting energy savings up to 40%.
VERSATILE 4-IN-1 MINI SPLIT: Dive into an all-season solution with our mini split AC and heating system, featuring air conditioning, a robust heat pump (functional up to 5F/-15C), dehumidifier, fan, and an accelerated turbo function. Enjoy the reliability of a DC Inverter that’s UL Listed, AHRI Certified, and Works with Alexa.
STYLISH & FUNCTIONAL MINI SPLIT AC: Crafted for both home and business, this mini split air conditioner provides dynamic performance without compromising on aesthetics. Ideal for bedrooms, living areas, commercial spaces like stores, eateries, and warehouses.
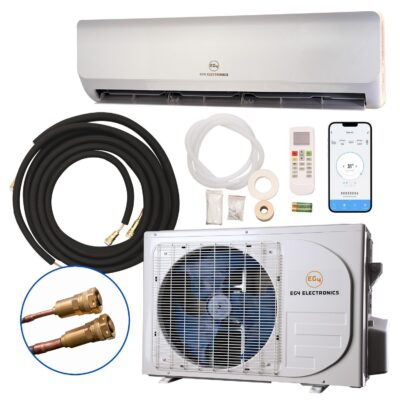
COMPLETE INSTALLATION PACKAGE: Comes with an indoor air handler, outdoor condenser, intuitive remote control, and a comprehensive installation kit featuring a 16ft. line set and communication wire. Pre-loaded with R410A refrigerant catering up to 25 ft. A heads-up: This system mandates professional installation – it’s not a DIY mini split AC.
TRUST WORTHY 5-YEAR WARRANTY: Your investment is safeguarded with our mini split heat pump’s industry-leading warranty – 5 years on parts replacement and another 5 on the compressor. Benefit from the established quality of Senville, complemented by complimentary technical assistance. Labor not included.
Additional information
Item Weight
78.3 pounds
Manufacturer
Senville
Item model number
SENL-12CD-16
Is Discontinued By Manufacturer
No
Form Factor
Mini-Split
Specifications
AHRI, ETL
Assembly required
No
Warranty Description
5 years on compressor., 2 years on parts.
Batteries required
No
Included Components
Outdoor Condenser, Indoor Air Handler
Capacity
1 Tons
Floor Area
700 Square Feet
Cable Length
16 Feet
Voltage
110 Volts
Noise Level
28 dB
8 reviews for Senville LETO Series Mini Split Air Conditioner Heat Pump, 12000 BTU 110/120V, Inverter, Works with Alexa, SEER2 20.8, 1 Ton, White
Rated 5 out of 5
Big apes –
I hired my AC guy to professionally install after his recommendation of this specific brand. A two man team installed this in a few hours. I needed it for my garage reno that just doesn’t stay cool enough in summer or warm enough in winter. The room faces west in central coastal FL and is adjacent to the inside laundry room. Between the brutal afternoon sun through the French door windows (with double layer velvet black out curtains and window tint) and the washer dryer unit giving off heat too, this room was great for tropical plants and lizards. I can now feel the cold air from two rooms away into my kitchen and dining room. It is fantastic. It’s also incredibly quiet. Like silent. Both inside unit as well as outside. My pool pump now sounds like a jet engine beside this thing in our back. Remote is easy to figure out and there are all kinds of features to program from cell phone app. This room is occupied by my college student that realized and accepted her personal benefit of staying home to complete her degree. This project cost me 1200$ and I believe it’s worth every dime. My AC guy LOVES these units and has installed them in lots of his own properties for his family and friends. I am planning to put a double unit on the other side of the house when financially feasible. My home AC unit works fine, but my Duke energy bill is 600$ a month during the summer. I believe this mini split will help reduce that cost with it’s miniscule amperage draw and magnificent cooling abilities. Not to mention, we can climate control spaces more personally. I could live in a 63 degree room quite comfortably. This thing will turn your space into a walk in cooler! I’ll update if I notice an improvement to my power bill. I would highly recommend professional installation.
Rated 5 out of 5
Defective –
If you have some technical skills, the install is a breeze. Some great install videos on youtube. The mini split works well both as an airconditioner and a heat pump.
Rated 5 out of 5
Big apes –
This unit is a great value. I am retired from the trade and found this easy to install and it performs very well. The customer service is great as I found that the package was missing one small part which they sent me immediately. Very happy with everything.
Rated 5 out of 5
kritz –
Hi,
I am a advance DIY and just finished the install. Did everything by the book. Unit starts (the fan of the indoor unit) but after a few minutes, shows error E1. I’ve recheck everything. Not sure how Senville (or Amazon will handle this)?
Edit,
Unit is now working perfectly. It was not an easy problem to troubleshoot. It ended-up being the terminal block in the indoor unit having a defective contact when tightening the screw. A new terminal block will be sent next week.
If you have issues, call support, they are there to help you. They even proposed to compensate me for the trouble I had with the system!
I now added the unit in Alexa and can control the unit. Very happy with my purchase.
Rated 5 out of 5
Services Spécialisés Trionyx Inc. –
Very happy with this purchase, unit comes pre-charged and installed it myself. 3 other family members have purchased this brand of A/C split units and are very happy with them, never had any issues, one family member has had hers for over 15 years now and it is still working great. Mine is also working fantastic, highly recommend don’t be fooled by some of those sales people with their high priced units being sold from hvac companies or stores, their units are not of supperior quality, let’s face it, 99% all come from that country we all know overseas.
Rated 5 out of 5
soundsorcerer –
Bought this for my 1350 Square Foot finished basement. This unit provides AC, Heat and dehumidifying which is exactly what I needed. After a month or more of use, it admirably provides all of that and does so efficiently and quietly!
Installation. This is the only Mini-split I have ever installed so there is always a learning curve. I am very familiar with HVAC and I have many of the tools already since I worked on automotive HVAC from time to time and I consider myself to be a pretty knowledgeable on the subject. You will need a set of gauges, evacuation/vacuum pump, you may need a flaring tool, a hole saw 3.5″….and if you were like me, I was going through brick and concrete block so be ready to spend some money on that since masonry bits that size with a drill to go with it are not cheap! If you are going through siding and wood it is a much easier proposition. I would also recommend getting a cover kit for all the piping so you can make it look neat and protect all of that from elements.
Power…you will need 220V at 25Amp, with a disconnect on the outside next to the unit and it will need to be accessible for future service and it is hardwired from your box to the outside AC unit. In my case, the air-handler that in on the inside of the home, is powered from a cable that comes from the outside unit so no additional receptacles were required.
With this purchase it came with 16′ of copper hose (two), a control power cable and drain hose. Depending on your application you may want to shorten the hoses or you may need to add to it. In either case this will require a flaring tool…fittings do come with the system if you need to this. If you need to extend the tubing to over 25′ you will also need to add “Freon” so unless you are a licensed A/C contractor, well you may need one for that. 16′ was actually perfect for my application.
I have a family member who is an electrician, so I had that part installed and permitted to keep everything up and up especially when/if I sell the house. He also helped me install the Mini-Split. It took us about 4 hours to install and we had no issues with the installation and because he is an electrician he had the 3.5″ masonry drill bit and 1/2 inch rotary drill that we needed.
I can say it was pretty straight forward and there are plenty of YouTube videos where people do step by step installation. The instructions are helpful but confusing at times, so this is where experience is helpful to read in between the lines…since the instructions are for multiple units they sell and they are not all the same!!!!
Now that I have done one I feel pretty confident to do another. I would also buy this product again with out hesitation. My only recommendation is if you have to buy the tools to be able to do the job, I would recommend just calling an AC professional and have them install. The cost of the necessary tools you may need may not be worth the investment unless you plan to do more of these in the future. If you do not even have a vacuum pump, gauges, flare tool etc, then you likely do not have experience either, and I would recommend you seek professional installation.
Note: I saw on some videos people not vacuuming out the lines and just putting the systems together and releasing the preloaded Freon into the system (avoiding the need to purchase or rent a evacuation/vac pump). This is a bad idea since it introduces air and moisture into the system that will degrade its performance, shorten life span of the components and voids the warranty, plus you need that step to check for leaks. Freon is not cheap!
Take a gut check on this. If you are handy and confident with your skills, go for it! If you are not sure, maybe seek someone out who has done it to help, or just call an competent HVAC tech to come out and do it for you.
Rated 5 out of 5
Benoit Dansereau –
This HVAC unit was received and installed about a month ago. It is a very quiet and efficient unit. It is also easy to operate. I am very satisfied with this purchase.
Rated 5 out of 5
Sean Place –
This has freed my attic window! No more noisy window AC.
Pros * Efficient and powerful. It can easily keep my finished attic cool, even with the sun beating down on the roof and my gaming PC throwing extra heat into the room. * Very quiet. (About the same noise level as my PC, and that is already pretty quiet) * Installation was easy for a fairly handy person. * Included WiFi/Smart function is a plus.
Cons * No mounting diagram for the head unit. I had to draw up my own to make sure I get it mounted to some studs and avoid hitting a stud with the line set. * No included cord grip connector for the head units power/signal cable. Not a big deal, but make sure you buy one of these before installation to save yourself a trip to the hardware store. * The Alexa integration doesn’t appear to take into account the units current status. So if you power it on through Alexa, and then turn it off using the remote; Alexa will still show it as powered on. This sometimes results in Alexa not working at all. I would try to turn the unit on and off and Alexa would show the command as successful but the AC was still powered off. The first time this happened the head unit was constantly beeping. No amount of Alexa commands or remote control commands would stop it. I had to pull the AC disconnect to forcefully restart the unit. Alexa also no longer reports the thermostat temperature. It constantly says 50f. The TLDR: Alexa integration is unreliable. * In heat mode, the minimum temperature is only 5f, which for my area is inadequate. There can be entire weeks in winter where the temperature never goes above 5f. Senville does have higher end versions which operate at much lower temperatures. But my attic usually stays warm enough on its own during the winter time. Summers are the big problem, which this unit has so far proven to be more than enough for.
Notes: I’ve owned this unit for 2 months now. I installed everything myself, but had a licensed HVAC tech flare the line set and fill the system (This is the minimum needed to get the warranty). I chose the 120V version since I already had a dedicated 120V 20A circuit for the old window AC. You get slightly better efficiency with the 240V version, but I did the math and after 5yrs of owner ship, the cost difference doesn’t make up the purchase price difference. Though this may not be the case if electricity is more expensive where you live (I pay around $0.11/kWh). This also means I can keep the dedicated receptacle I installed since the circuit is staying 120V. The unit seems to maintain around 550watt draw, but will hit up to 1,200watts when the room is hot enough. It can draw as little as 150watts, especially when running in eco mode.


Big apes –
I hired my AC guy to professionally install after his recommendation of this specific brand. A two man team installed this in a few hours. I needed it for my garage reno that just doesn’t stay cool enough in summer or warm enough in winter. The room faces west in central coastal FL and is adjacent to the inside laundry room. Between the brutal afternoon sun through the French door windows (with double layer velvet black out curtains and window tint) and the washer dryer unit giving off heat too, this room was great for tropical plants and lizards. I can now feel the cold air from two rooms away into my kitchen and dining room. It is fantastic. It’s also incredibly quiet. Like silent. Both inside unit as well as outside. My pool pump now sounds like a jet engine beside this thing in our back.
Remote is easy to figure out and there are all kinds of features to program from cell phone app. This room is occupied by my college student that realized and accepted her personal benefit of staying home to complete her degree. This project cost me 1200$ and I believe it’s worth every dime. My AC guy LOVES these units and has installed them in lots of his own properties for his family and friends. I am planning to put a double unit on the other side of the house when financially feasible. My home AC unit works fine, but my Duke energy bill is 600$ a month during the summer. I believe this mini split will help reduce that cost with it’s miniscule amperage draw and magnificent cooling abilities. Not to mention, we can climate control spaces more personally. I could live in a 63 degree room quite comfortably. This thing will turn your space into a walk in cooler!
I’ll update if I notice an improvement to my power bill.
I would highly recommend professional installation.
Defective –
If you have some technical skills, the install is a breeze.
Some great install videos on youtube.
The mini split works well both as an airconditioner and a heat pump.
Big apes –
This unit is a great value. I am retired from the trade and found this easy to install and it performs very well. The customer service is great as I found that the package was missing one small part which they sent me immediately. Very happy with everything.
kritz –
Hi,
I am a advance DIY and just finished the install. Did everything by the book.
Unit starts (the fan of the indoor unit) but after a few minutes, shows error E1. I’ve recheck everything.
Not sure how Senville (or Amazon will handle this)?
Edit,
Unit is now working perfectly. It was not an easy problem to troubleshoot. It ended-up being the terminal block in the indoor unit having a defective contact when tightening the screw. A new terminal block will be sent next week.
If you have issues, call support, they are there to help you. They even proposed to compensate me for the trouble I had with the system!
I now added the unit in Alexa and can control the unit. Very happy with my purchase.
Services Spécialisés Trionyx Inc. –
Very happy with this purchase, unit comes pre-charged and installed it myself. 3 other family members have purchased this brand of A/C split units and are very happy with them, never had any issues, one family member has had hers for over 15 years now and it is still working great. Mine is also working fantastic, highly recommend don’t be fooled by some of those sales people with their high priced units being sold from hvac companies or stores, their units are not of supperior quality, let’s face it, 99% all come from that country we all know overseas.
soundsorcerer –
Bought this for my 1350 Square Foot finished basement. This unit provides AC, Heat and dehumidifying which is exactly what I needed. After a month or more of use, it admirably provides all of that and does so efficiently and quietly!
Installation. This is the only Mini-split I have ever installed so there is always a learning curve. I am very familiar with HVAC and I have many of the tools already since I worked on automotive HVAC from time to time and I consider myself to be a pretty knowledgeable on the subject. You will need a set of gauges, evacuation/vacuum pump, you may need a flaring tool, a hole saw 3.5″….and if you were like me, I was going through brick and concrete block so be ready to spend some money on that since masonry bits that size with a drill to go with it are not cheap! If you are going through siding and wood it is a much easier proposition. I would also recommend getting a cover kit for all the piping so you can make it look neat and protect all of that from elements.
Power…you will need 220V at 25Amp, with a disconnect on the outside next to the unit and it will need to be accessible for future service and it is hardwired from your box to the outside AC unit. In my case, the air-handler that in on the inside of the home, is powered from a cable that comes from the outside unit so no additional receptacles were required.
With this purchase it came with 16′ of copper hose (two), a control power cable and drain hose. Depending on your application you may want to shorten the hoses or you may need to add to it. In either case this will require a flaring tool…fittings do come with the system if you need to this. If you need to extend the tubing to over 25′ you will also need to add “Freon” so unless you are a licensed A/C contractor, well you may need one for that. 16′ was actually perfect for my application.
I have a family member who is an electrician, so I had that part installed and permitted to keep everything up and up especially when/if I sell the house. He also helped me install the Mini-Split. It took us about 4 hours to install and we had no issues with the installation and because he is an electrician he had the 3.5″ masonry drill bit and 1/2 inch rotary drill that we needed.
I can say it was pretty straight forward and there are plenty of YouTube videos where people do step by step installation. The instructions are helpful but confusing at times, so this is where experience is helpful to read in between the lines…since the instructions are for multiple units they sell and they are not all the same!!!!
Now that I have done one I feel pretty confident to do another. I would also buy this product again with out hesitation. My only recommendation is if you have to buy the tools to be able to do the job, I would recommend just calling an AC professional and have them install. The cost of the necessary tools you may need may not be worth the investment unless you plan to do more of these in the future. If you do not even have a vacuum pump, gauges, flare tool etc, then you likely do not have experience either, and I would recommend you seek professional installation.
Note: I saw on some videos people not vacuuming out the lines and just putting the systems together and releasing the preloaded Freon into the system (avoiding the need to purchase or rent a evacuation/vac pump). This is a bad idea since it introduces air and moisture into the system that will degrade its performance, shorten life span of the components and voids the warranty, plus you need that step to check for leaks. Freon is not cheap!
Take a gut check on this. If you are handy and confident with your skills, go for it! If you are not sure, maybe seek someone out who has done it to help, or just call an competent HVAC tech to come out and do it for you.
Benoit Dansereau –
This HVAC unit was received and installed about a month ago. It is a very quiet and efficient unit. It is also easy to operate. I am very satisfied with this purchase.
Sean Place –
This has freed my attic window! No more noisy window AC.
Pros
* Efficient and powerful. It can easily keep my finished attic cool, even with the sun beating down on the roof and my gaming PC throwing extra heat into the room.
* Very quiet. (About the same noise level as my PC, and that is already pretty quiet)
* Installation was easy for a fairly handy person.
* Included WiFi/Smart function is a plus.
Cons
* No mounting diagram for the head unit. I had to draw up my own to make sure I get it mounted to some studs and avoid hitting a stud with the line set.
* No included cord grip connector for the head units power/signal cable. Not a big deal, but make sure you buy one of these before installation to save yourself a trip to the hardware store.
* The Alexa integration doesn’t appear to take into account the units current status. So if you power it on through Alexa, and then turn it off using the remote; Alexa will still show it as powered on. This sometimes results in Alexa not working at all. I would try to turn the unit on and off and Alexa would show the command as successful but the AC was still powered off. The first time this happened the head unit was constantly beeping. No amount of Alexa commands or remote control commands would stop it. I had to pull the AC disconnect to forcefully restart the unit. Alexa also no longer reports the thermostat temperature. It constantly says 50f. The TLDR: Alexa integration is unreliable.
* In heat mode, the minimum temperature is only 5f, which for my area is inadequate. There can be entire weeks in winter where the temperature never goes above 5f. Senville does have higher end versions which operate at much lower temperatures. But my attic usually stays warm enough on its own during the winter time. Summers are the big problem, which this unit has so far proven to be more than enough for.
Notes:
I’ve owned this unit for 2 months now. I installed everything myself, but had a licensed HVAC tech flare the line set and fill the system (This is the minimum needed to get the warranty). I chose the 120V version since I already had a dedicated 120V 20A circuit for the old window AC. You get slightly better efficiency with the 240V version, but I did the math and after 5yrs of owner ship, the cost difference doesn’t make up the purchase price difference. Though this may not be the case if electricity is more expensive where you live (I pay around $0.11/kWh). This also means I can keep the dedicated receptacle I installed since the circuit is staying 120V. The unit seems to maintain around 550watt draw, but will hit up to 1,200watts when the room is hot enough. It can draw as little as 150watts, especially when running in eco mode.